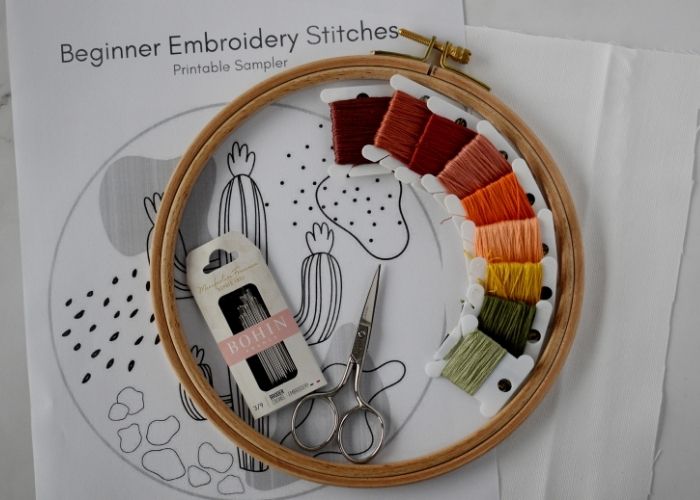
Points de broderie pour débutants + échantillonneur gratuit de broderie à la main de cactus pour apprendre les bases
La broderie à la main est un artisanat ancien qui est devenu un passe-temps moderne populaire. Il s’agit d’une activité amusante et relaxante qui profite à votre santé mentale et d’une compétence pratique qui vous permet de créer de l’art textile, de réparer et d’embellir vos vêtements, ou de créer des textiles de maison et des cadeaux originaux.
Envie d’apprendre la broderie à la main ? Ce tutoriel de broderie à la main vous guidera étape par étape pendant que vous apprenez les points de broderie pour débutants et brodez un échantillonneur amusant avec un cactus abstrait dans la scène du désert. Téléchargez un modèle PDF Cactus gratuit et apprenez les points de broderie pour débutants dès aujourd’hui !
Démarrage d’un projet de broderie à la main
Avant de vous lancer dans l’apprentissage des points de broderie pour débutants, voici quelques éléments que vous devez préparer :
- Gather tools and materials. You will need a fabric, embroidery floss, a hoop, an embroidery needle, and small scissors. Head to the Hand Embroidery Supplies page on this blog for the list of tools and materials I use and recommend.
- Decide on the pattern transfer method you want to use. If you plan to embroider on light-colored fabric, the lightbox method with a friction pen is the most simple and affordable method that I use the most. Read the article “How To Trace Pattern on Fabric: Five Methods For Fast And Easy Embroidery Pattern Transfer” to learn how to choose the best fitting method and what materials you will need for it.
- If you are an absolute beginner, I recommend reading the article Hand Embroidery Basics: A Beginner’s Guide to Needlework before you dive into your first stitching project.
- Planifier. Allez-vous encadrer votre échantillonneur fini dans un cerceau pour la décoration murale ? Ou voulez-vous le transformer en taie d’oreiller ou en sac fourre-tout ? Coupez votre tissu en conséquence, en laissant suffisamment de matière pour le projet que vous souhaitez réaliser plus tard.
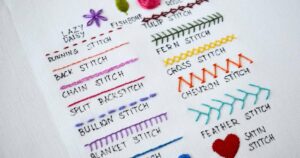
Points de broderie pour débutants
Pour rendre l’apprentissage des points de broderie pour débutants amusant et dynamique, j’ai inclus neuf techniques de broderie à la main que vous pouvez utiliser pour les contours, le remplissage et la décoration.
Backstitch
Backstitch is the most basic embroidery technique for outlines, lettering, sewing, and filling. Small, straight stitches create fluid lines that can be embroidered straight or curved.
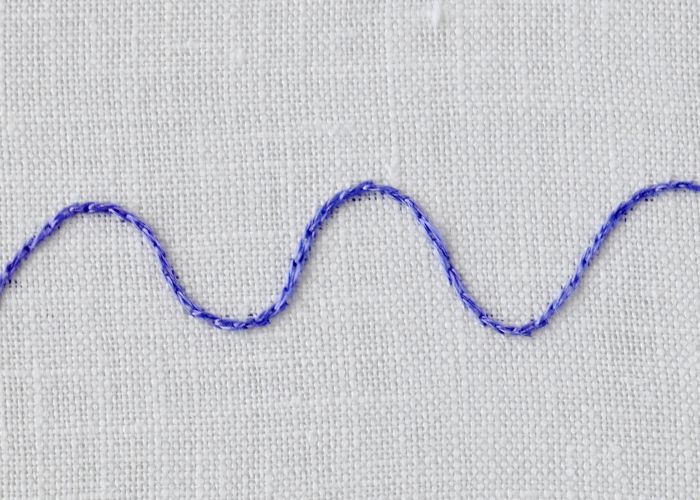
Point de tige
Stem Stitch is another hand embroidery technique suitable for beginners and widely used in hand embroidery. This stitch creates a fluid line and is used for outlines, lettering, or filling. This stitch is indispensable in botanical embroidery.
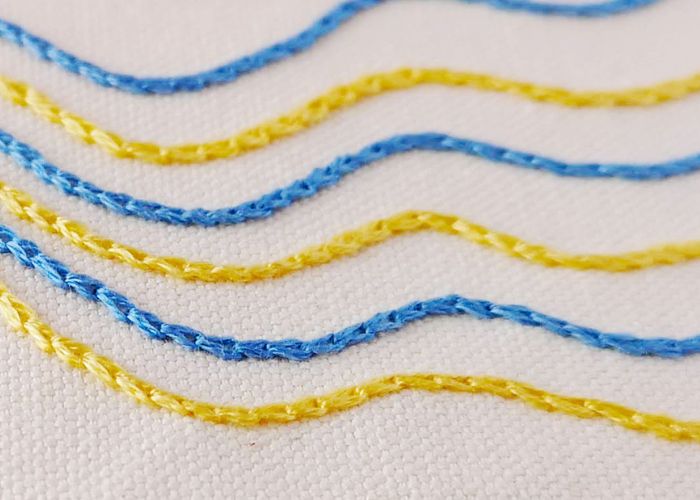
Point arrière fendu
Split Backstitch is a variation of the Backstitch that creates smooth lines. This beginner-friendly technique is widely used for outlines, lettering, and as a base for filling stitches. In this Cactus sampler embroidery project, we will use Split Backstitch as an outline stitch and as a base for Satin Stitch and Long and Short stitch.
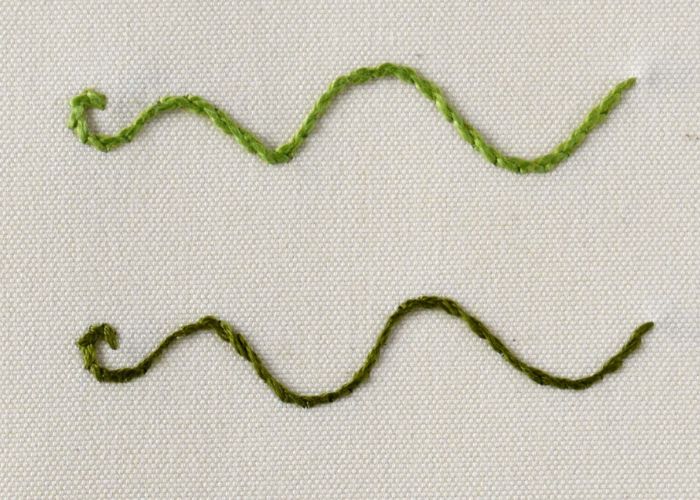
Point de chaînette
Chain Stitch is a very decorative yet simple hand embroidery technique every beginner should learn. Small loops connected into a line create a decorative line, letters, or embellishments. You can use this stitch for borders, outlines, or filling.
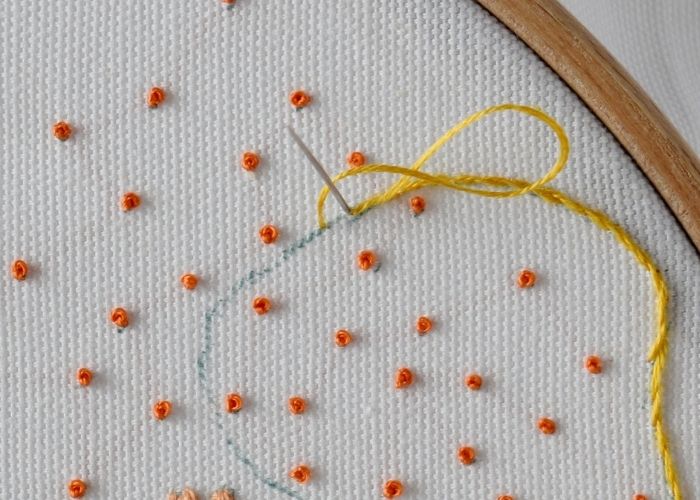
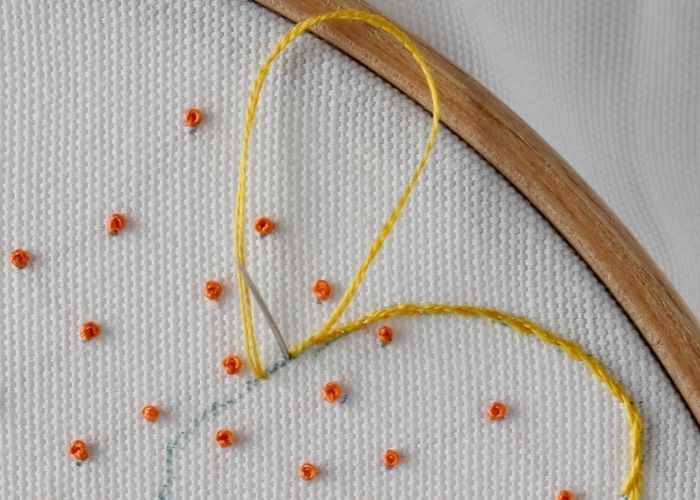
Point de chaînette détaché
Detached Chain Stitch is another beginner-friendly embroidery stitch that has multiple uses. With this stitch, you can add decorative accents to your embroidery project, fill it, create lines, or mix it with other stitches to make complex decorative bands.
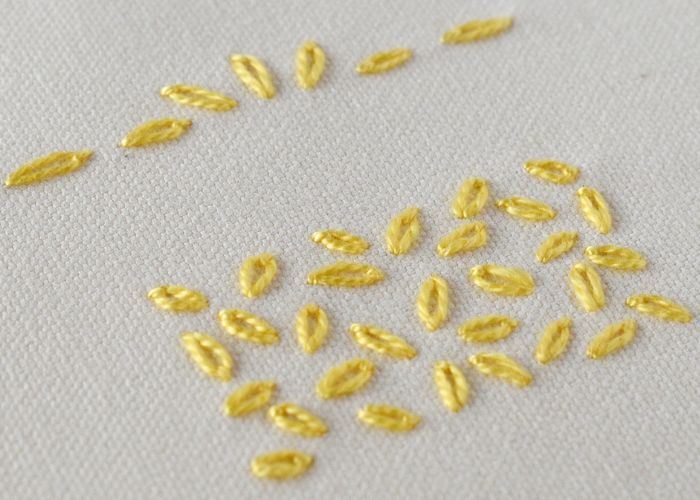
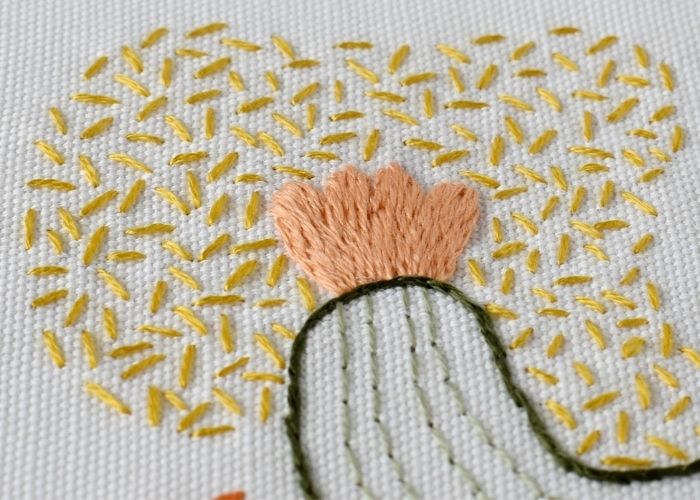
Point de graine

Seed Stitch is the most straightforward filling technique you can learn fast and use for various projects. This simple embroidery technique will surprise you with all its creative possibilities. Even if the method is straightforward, it has loads of options for personalization and variations – from length and colors to density and texture.
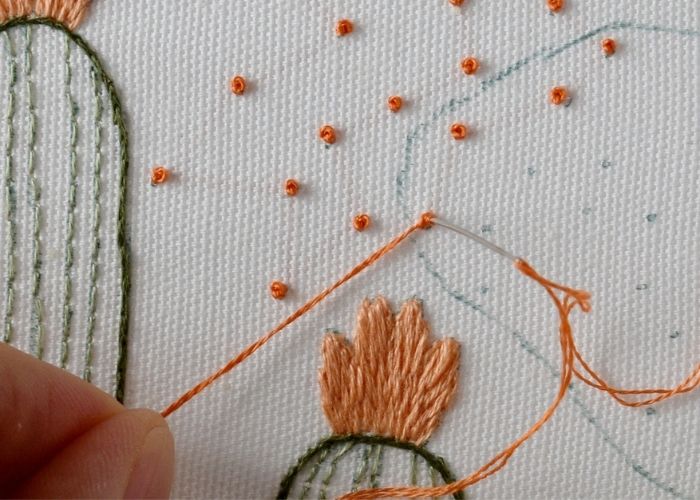
Nœuds français
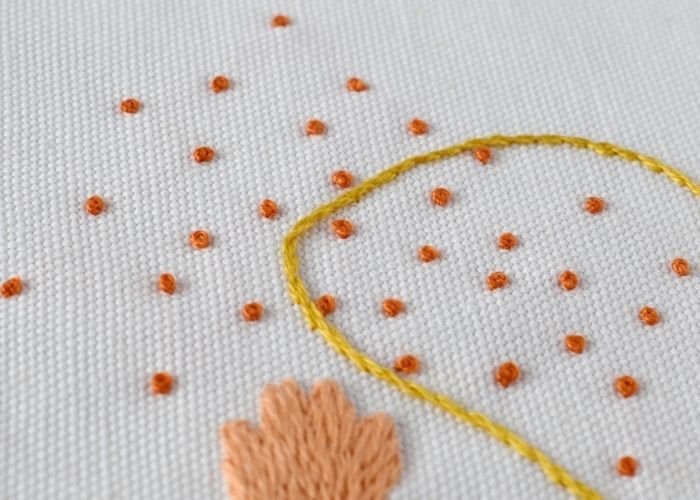
French Knot Stitch is a textural decorative hand embroidery technique. It has many uses – from filling areas and accent stitches to being a part of complex composite stitches.
Ce point a la réputation d’être difficile, mais n’ayez crainte. Suivez ces conseils simples et vous adorerez les nœuds français comme moi :
- Utilisez les deux mains pour faire ce point.
- Enroulez le fil autour de l’aiguille 2 fois (3 fois maximum). Si vous avez besoin d’un nœud plus gros, utilisez un fil plus épais ou plus de brins.
- Laissez un petit espace entre le début de la maille et l’endroit où vous enfoncez l’aiguille dans le tissu. Le nœud ne sautera pas à l’arrière du matériau.
- Tirez lentement le fil à travers les enveloppes jusqu’à l’arrière du tissu. De plus, maintenez le fil de travail sous tension jusqu’au dernier moment possible lorsqu’il passe à l’arrière du chiffon.
- Utilisez une aiguille de modiste au lieu d’une aiguille à broder. Il a un chas de la même épaisseur que la tige, il est donc facile de passer l’aiguille à travers les enveloppes serrées sans s’accrocher à l’œil.
Point de satin
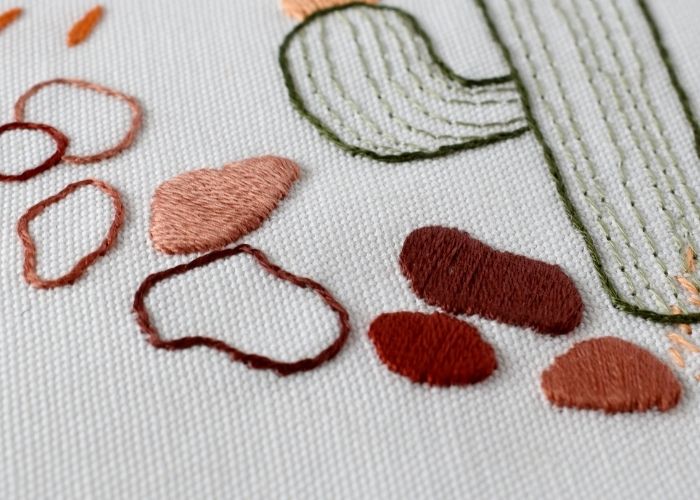
Satin Stitch is a popular filling technique that beginners should learn. You will find this stitch in many embroidery patterns and projects. Therefore, you should learn it at the beginning of your stitching journey. Satin Stitch is widely used but has a reputation for being a complex stitch.
Voici quelques conseils pour un point de satin lisse :
- Les fils plus fins (ou brins simples) fonctionnent mieux que les fils plus nombreux ou plus épais.
- Un tissu de fond avec un nombre élevé et un tissage ferme et complet fonctionnera mieux.
- Gardez-le petit ; N’essayez pas de remplir de vastes zones avec ce point.
- Lors de la broderie, commencez le point de satin au milieu et déplacez-vous sur les côtés du motif.
- Pour de plus beaux bords, tracez d’abord le contour de la forme (nous utiliserons le point arrière fendu pour les contours).
Point long et point court
Le point long et court, alias peinture au fil, est une technique de broderie à la main pour le remplissage qui recouvre entièrement le tissu. Ce point de broderie à la main est populaire et est largement utilisé dans différents styles de broderie. La technique de peinture au fil est populaire dans la broderie à main levée moderne pour ombrer les pétales de fleurs, les oiseaux et les animaux. Dans le crewelwork jacobéen, des éléments botaniques plus grands comme des branches et des animaux sont représentés à l’aide de ce point.
Read the article “Long and Short Stitch for Round Shapes. Learn how to Embroider a Sphere and a Circle” for additional guidance on the Long and Short Stitch.
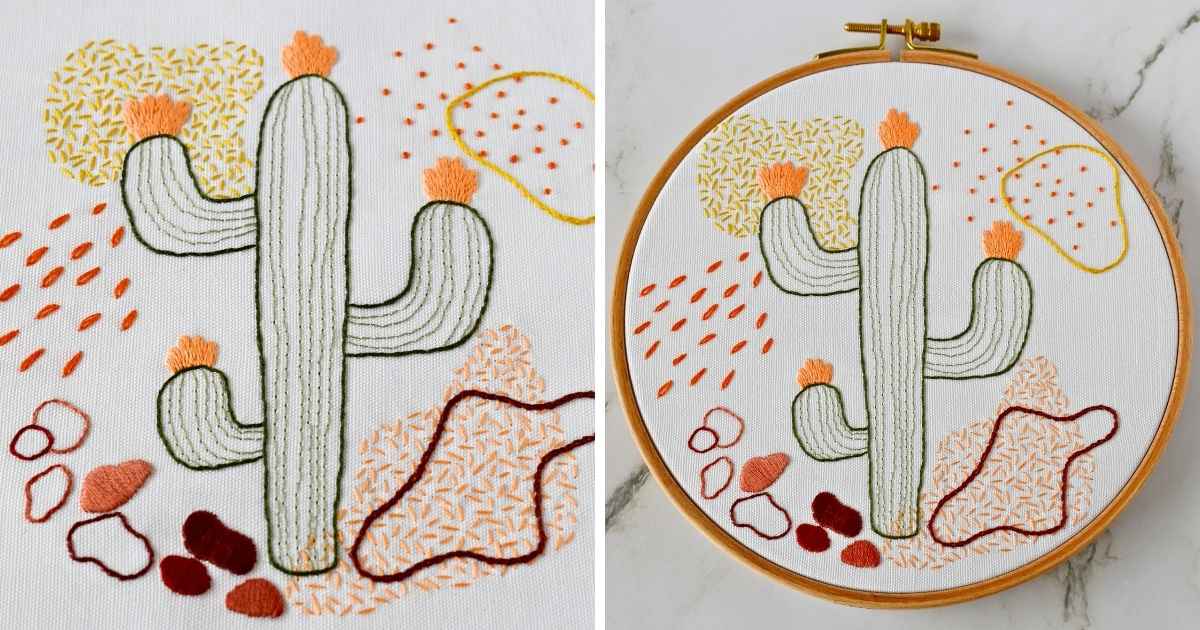
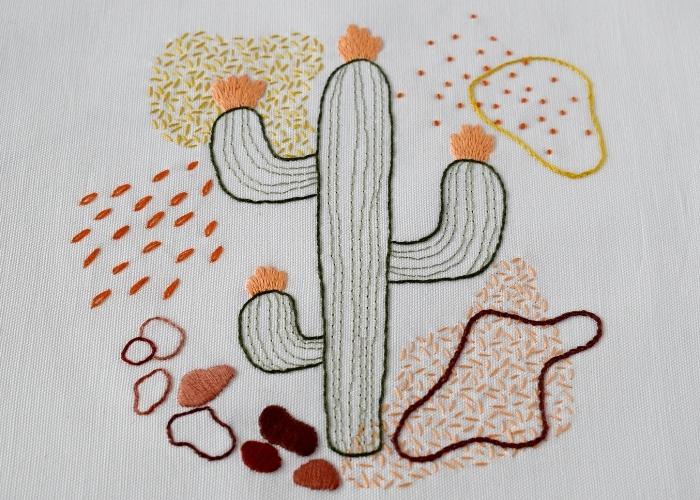
Projet de broderie à la main pour apprendre les points de broderie pour débutants
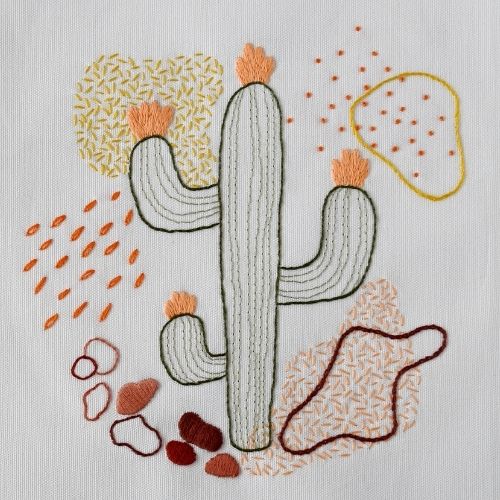
Cactus : échantillonneur de broderie à la main
Péages et matériaux
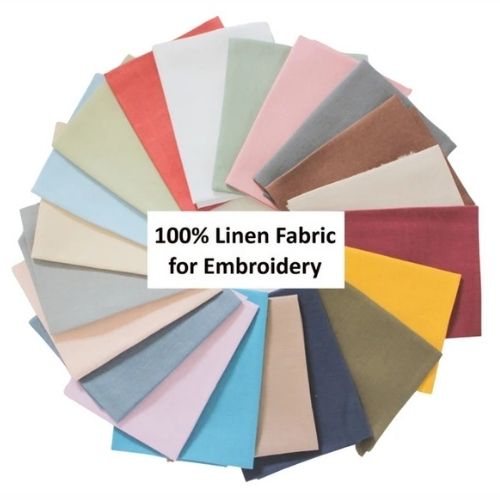
- Tissu. J’ai utilisé un mélange de lin et de coton blanc.
- Un cerceau. Le mien mesure 18 cm.
- Fil à broder. J’ai utilisé du fil à broder DMC.
- Aiguilles à broder.
- Ciseaux.
- Stylo à friction pour le transfert de motifs.
Step-by-step hand embroidery tutorial
- Gather tools and materials
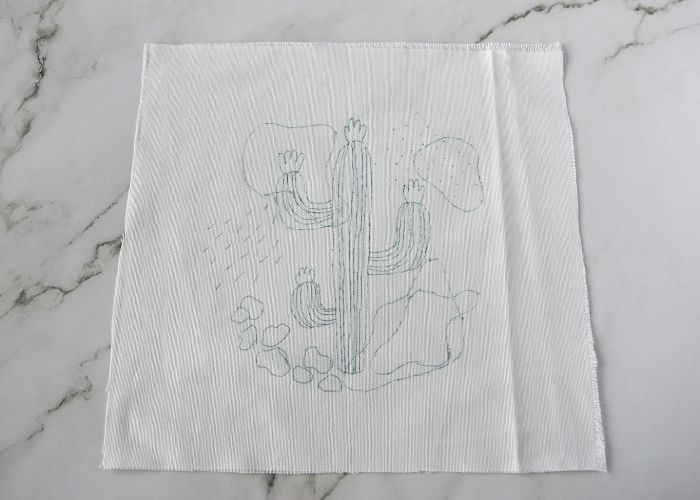
Download and print the Cactus PDF pattern. Choose colors for the project.
- Transfer the pattern to the fabric
I used a Lightbox method and a friction pen, but you can choose any method you prefer.
- Frame the fabric in a hoop
Adjust the tension and tighten the tensions screw. You can use a hoop stand for stability and the possibility to use both hands for stitching.

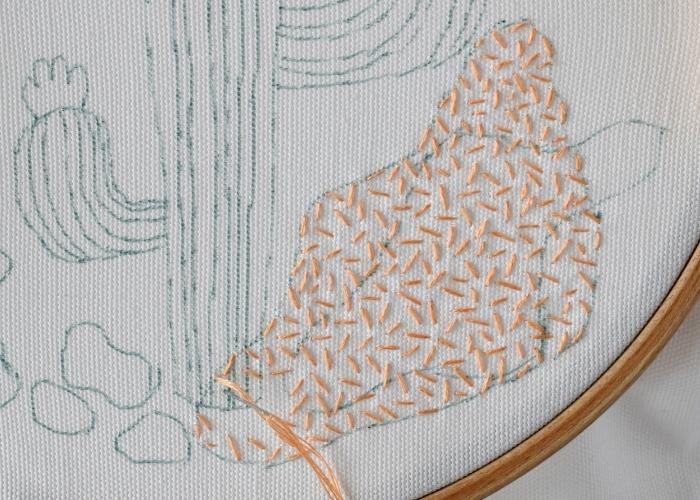
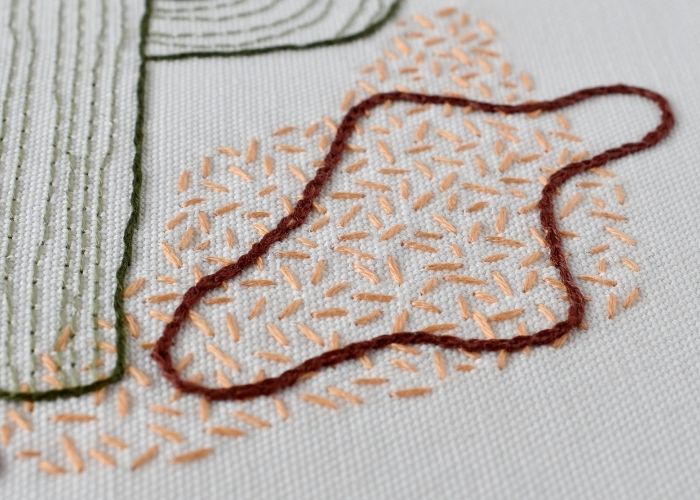
- Seed Stitch filling
Use two strands of embroidery floss and fill the shape with small straight stitches in random directions.
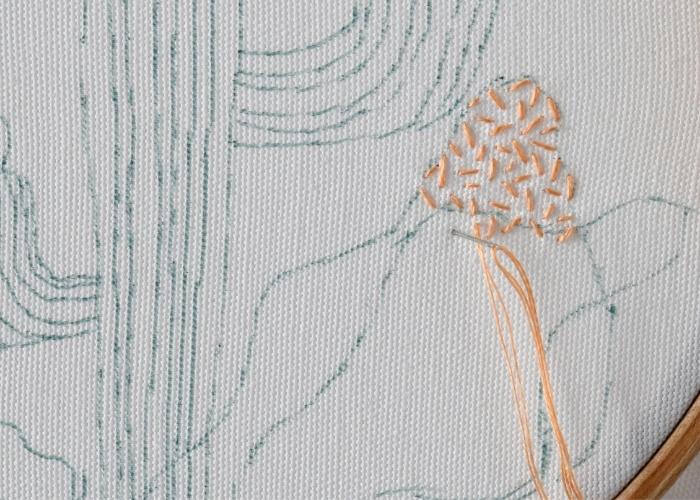
- Keep the same size
As you move, filling the shape, try to keep the stitches of a similar size and maintain the same density throughout the shape.
- Chain Stitch
Outline the shape with a Chain Stitch. Make small stitches as they follow the curves better.
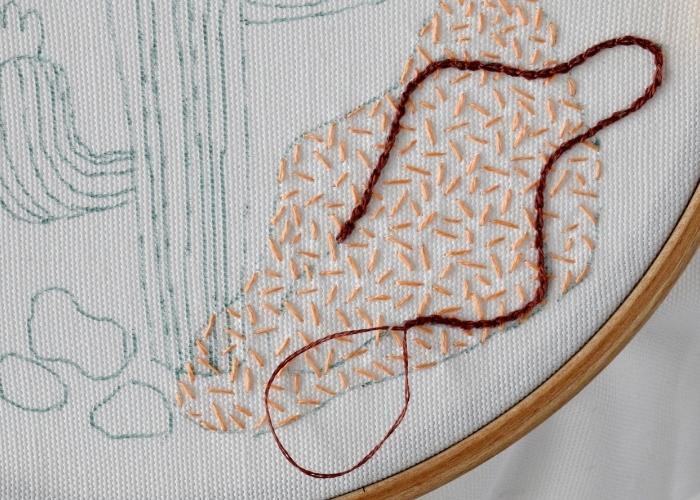
- Close the shape
To make a nice finish to the shape, connect the last stitch to the first one in an invisible circle. Watch a video lesson, “Chain Stitch Mastery: Unlock Secrets of Chain Stitch Hand Embroidery!” for more tips on Chain Stitch embroidery.
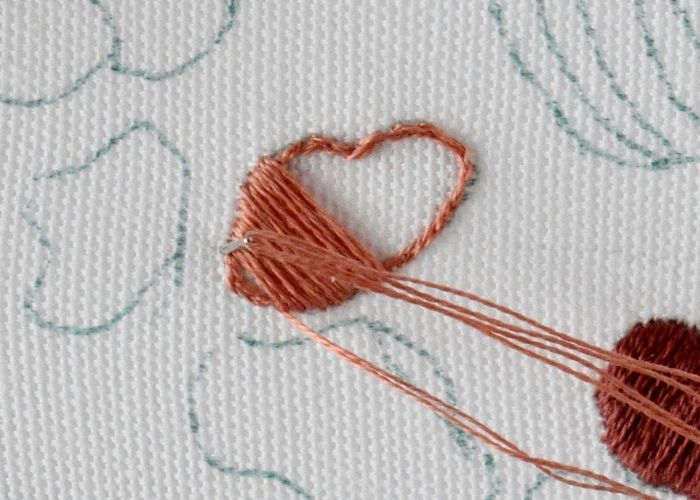
- Satin Stitch – outline
To make a Satin Stitch with a neat border, first outline the shape with a Split Backstitch.
- Satin Stitch – filling
Start filling from the center of the shape. Keep all the stitches parallel to the first one.
- Satin Stitch – filling
First, fill one side of the shape.
- Satin Stitch – filling
Then, return to the shape’s center and fill the design’s second part.
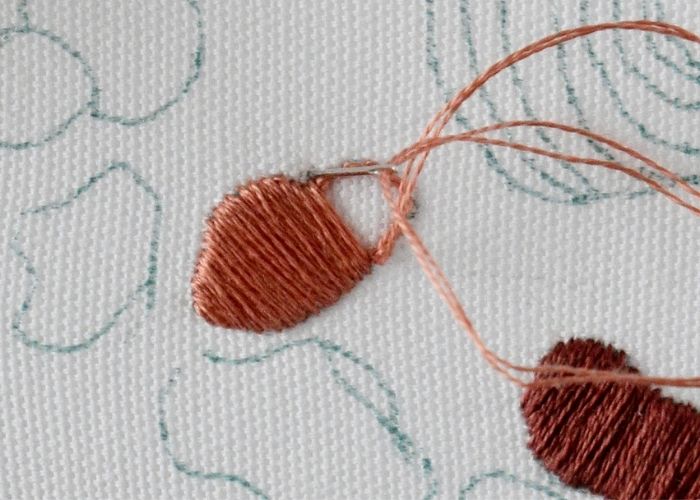
- Split Backstitch
After you fill some pebbles with Satin Stitch, outline others with a Split Backstitch.

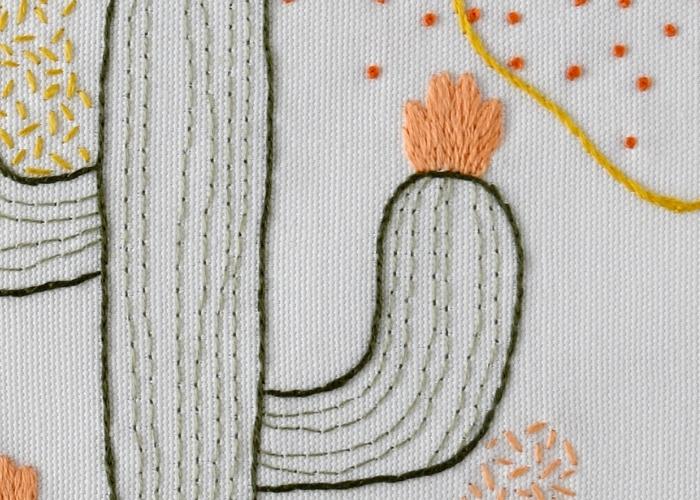
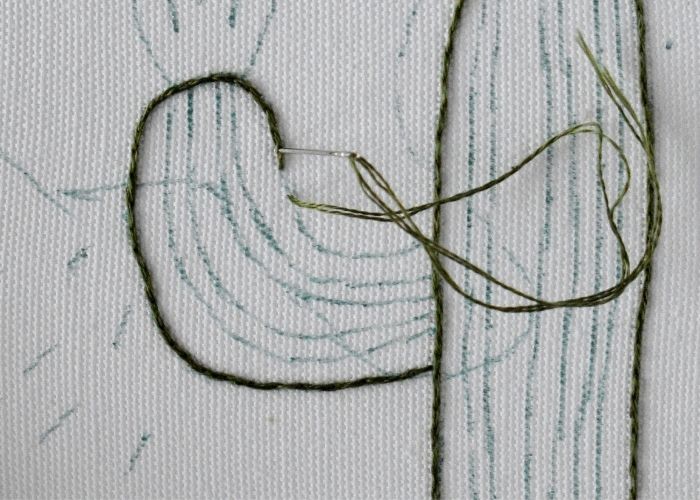
- Outline the Cactus
Use a Split Backstitch to outline the shape of the Cactus plant. Start with the central part.
- Outline the branches
Use the same Split Backstitch to outline the branches of the Cactus.
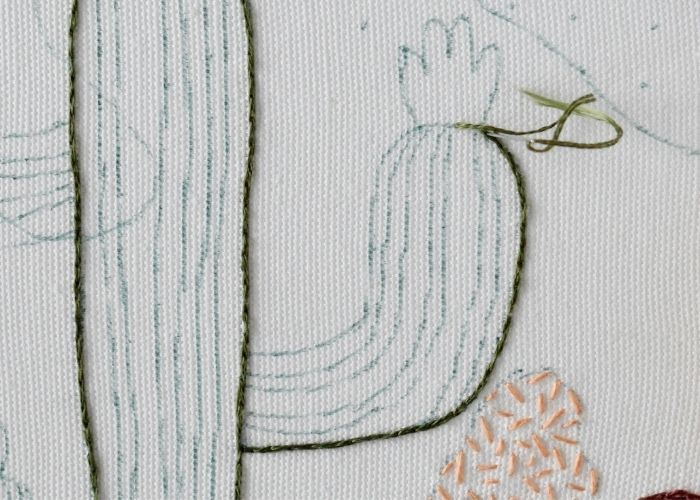
- Finish outline
On the curves, make your stitches slightly shorter; this way, the curves will look smoother.
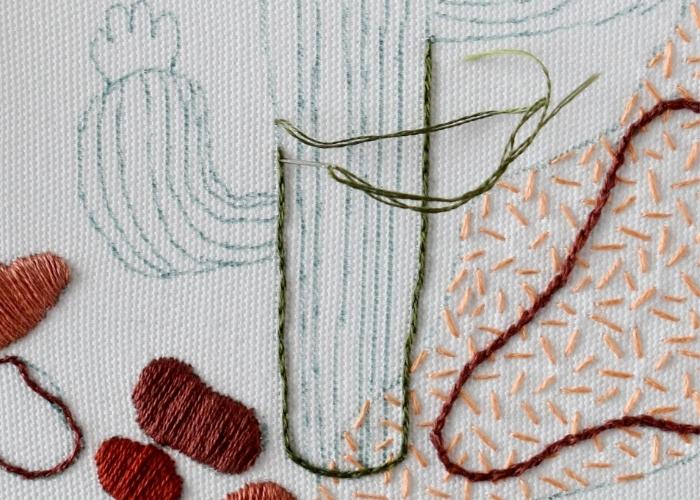
- Backstitch
Embroider all the inner lines on the Cactus with a Backstitch. Use a single strand of embroidery floss.
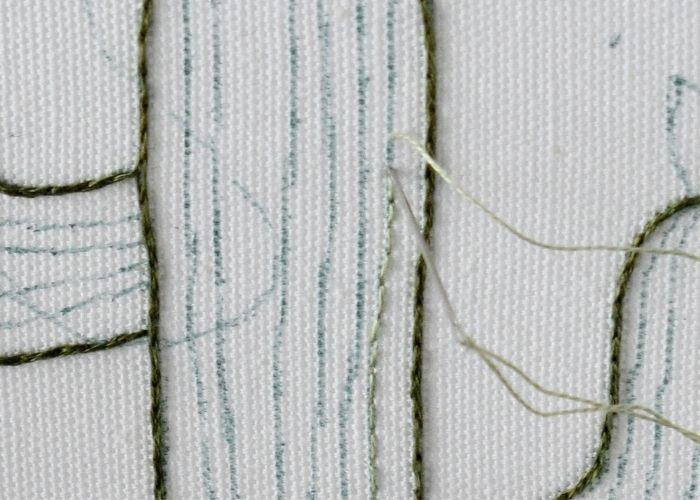
- Backstitch
You can embroider with a Backstitch in both directions, so do not cut the thread; move up and down and left and right until you embroider all the design lines.
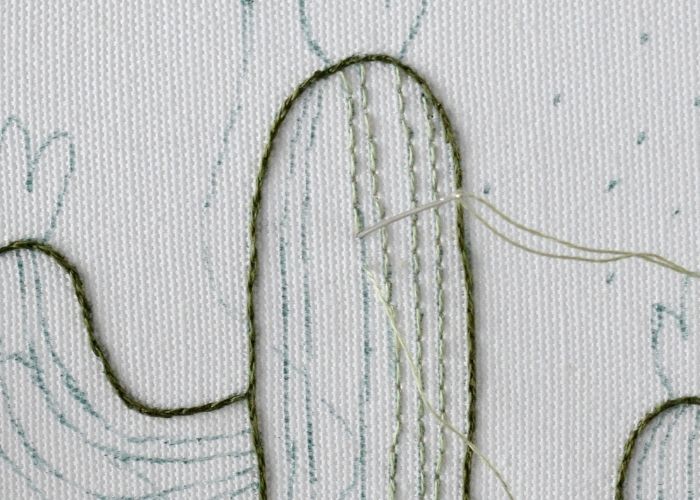
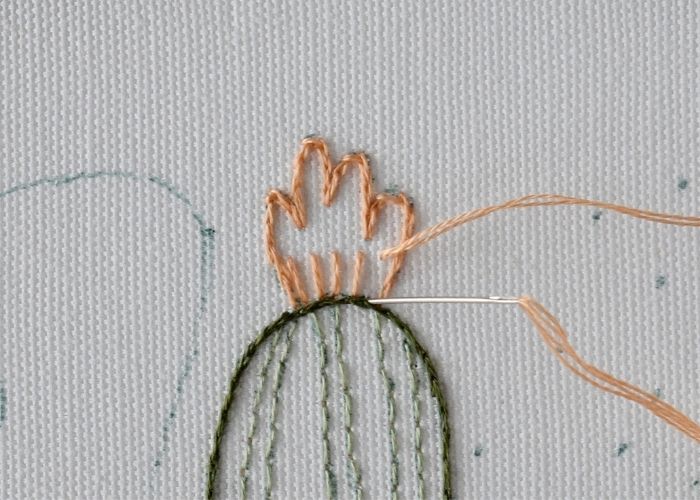
- Long and Short Stitch – outline
First, outline the flowers of the Cactus with a Split Backstitch. This will create a neat border for your Long and Short Stitch.
- Start with guiding lines
Before you start filling, make some guiding stitches that will indicate the direction for the upcoming stitches.
- Rows of Long and Short stitch
Add stitches row after row, till the entire shape is filled.
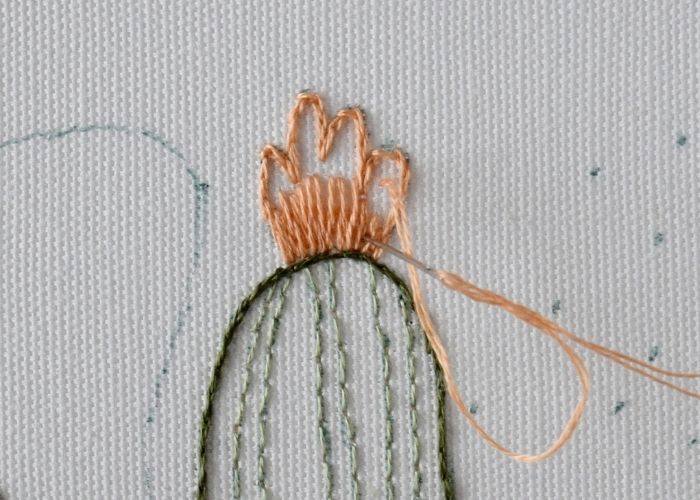
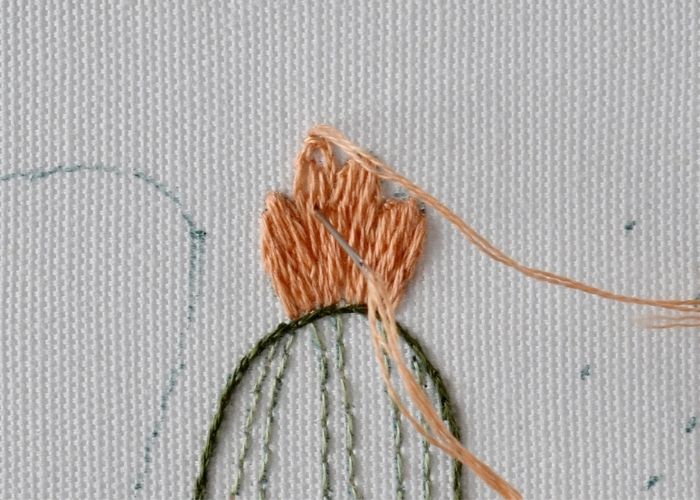
- Carefully fill the edges
Finally, make the stitches that will cover the last pieces of the fabric still visible.
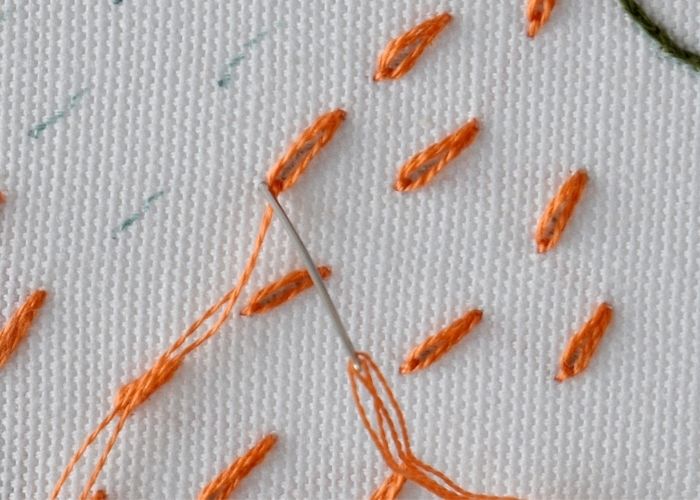
- French Knots
Embroider the cloud of French knots. Twist the thread around the needle twice.
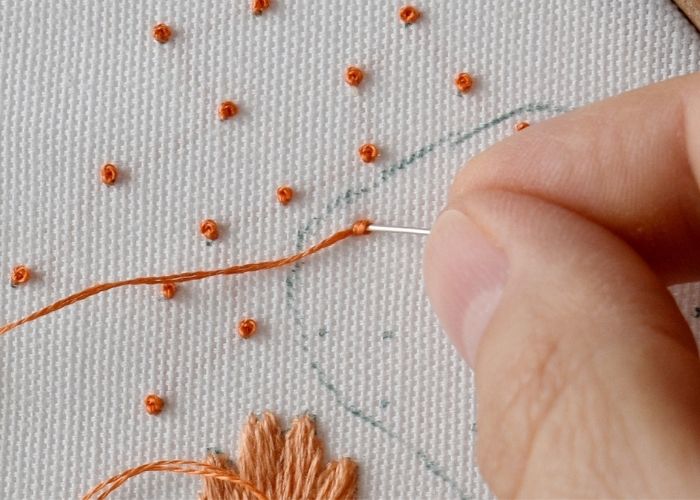
- French knots
Keep the working thread in tension till the last moment.
- Stem Stitch
Outline the shape with a Stem Stitch.
- Stem Stitch
Remember to keep the loop open in the same direction when you move around the shape.
- Seed Stitch
Fill the second shape with a Seed Stitch.

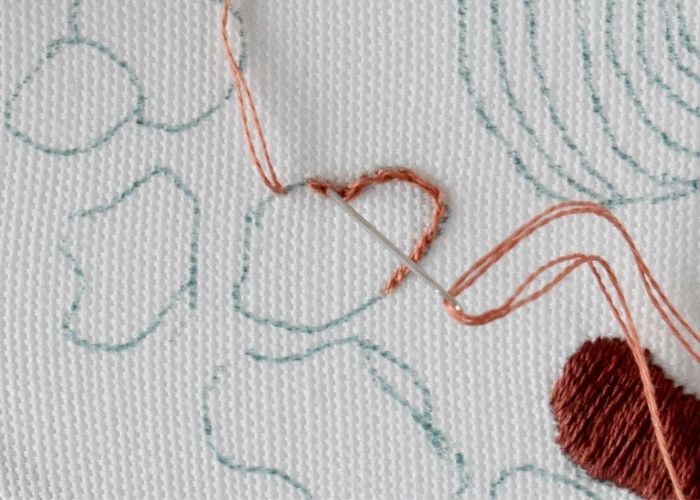
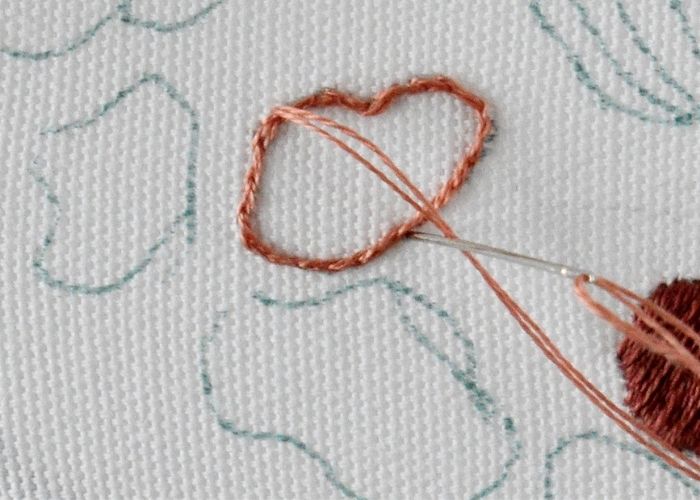
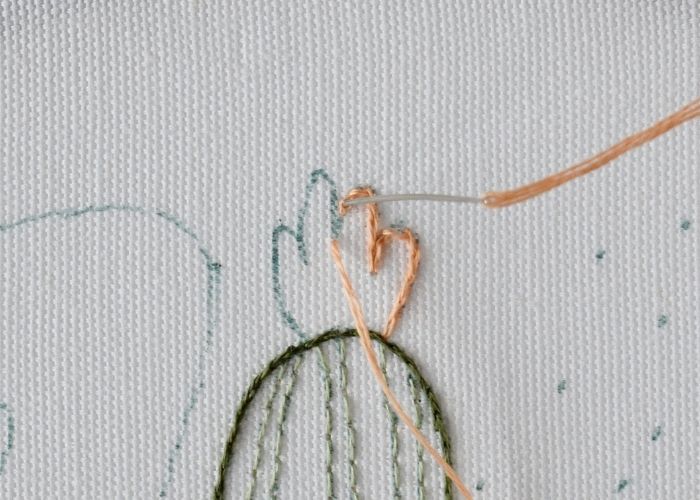
- Detached Chain Stitch
Make a single chain stitch on each line of the design. First, make an open loop.
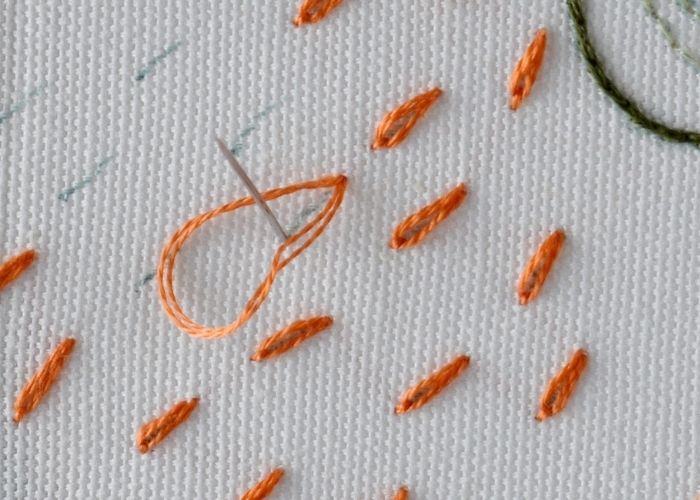
- Detached Chain Stitch
Tighten the loop and add an anchoring stitch.
Tutoriel vidéo
Produits recommandés
Disclaimer. To cover the cost of creating free embroidery patterns and video tutorials for this blog, I do sometimes link to products. Please assume these links are affiliate links. If you choose to buy through my links then THANK YOU! – it will make it possible for me to keep doing this.


À vous de jouer

Ce projet de couture avec des points de broderie pour débutants a été créé pour vous donner de l’inspiration et un échantillonneur pour apprendre et pratiquer les points de broderie à la main pour débutants avec un motif amusant que vous pourrez ensuite utiliser pour créer quelque chose d’utile et de pratique.
Prenez votre temps et ne vous pressez pas de terminer le design du cactus en une journée. Donnez du temps à chaque technique et ne visez pas la perfection ! Seules de longues heures de pratique et de patience permettront d’obtenir des points nets.
If you wish to frame this embroidered Cactus in a hoop and use it as a wall decor – read the article “How to Frame Embroidery in a Hoop: Six Methods of Finishing the Back of the Hoop” and I’m sure you will find a method that suites your needs.
Don’t miss a thing!
Follow me on YouTube, Instagram, Facebook, Flipboard, Telegram and Pinterest. On the other hand, you can subscribe to the Practical Embroidery newsletter and get embroidery tips straight to your inbox every week!
En savoir plus sur la broderie à la main pour les débutants
Matériel de broderie pour les débutants. Tout ce dont vous avez besoin pour commencer à apprendre la broderie à la main
Les bases de la broderie à la main : un guide du débutant pour les travaux d’aiguille